Universal IKEv2 Server Configuration

IKEv2 is a modern protocol developed by Microsoft and Cisco which was chosen as a default VPN type in OS X 10.11 (El Capitan) and Windows since 7. It supports strong encryption, auto reconnection on network change (MOBIKE), easy configuration and more.
This manual describes minimal IKEv2 server configuration for the most simple client setup based on username/password authentication.
No 3rd party software required on client side Only native OS tools used on client devices with Windows, MacOS, iOS.
No certificates importing on client Simple configuration. Just type login/passowrd and server address like any other VPN connection.
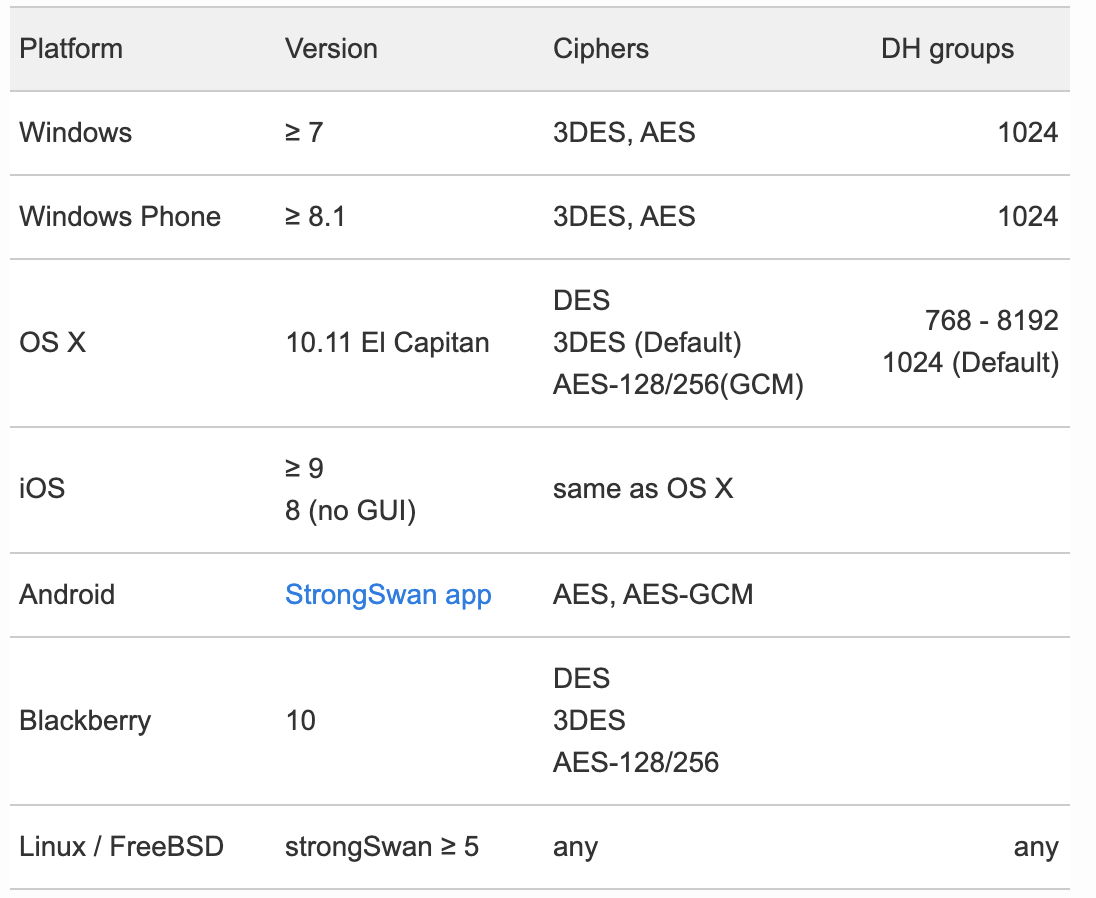
IKEv2 supported platforms
X.509 Certificates intro
In order to prevent man-in-the-middle attacks IPsec IKEv2 server always authenticates itself with an X.509 certificate using a strong RSA or ECDSA signature. After a secure communication channel has been established, clients authenticate themselves using the EAP-MSCHAPv2 protocol based on user name and password (or other authentication protocol). This means that client needs to verify X.509 certificate authenticity using CA in system keychan. Just as for HTTPS connections in a web browser. Server certificate must be valid for successful client authentication.
There are two ways of getting server certificate:
1. Use certificate issued by CA trusted by most operating systems. 2. Issue self-signed certificate and distribute your own CA to every clients’ system.
The First way makes connection setup much easier on client side because it does not require importing any certificates in the system. This way is recommended. Self-signed certificates are more complicated. Follow this way only if you know exactly what you need them for and how to manage your own PKI.
Issue certificate from one of Ceritifaces Authorities
Fortunately X.509 certificates that we used to deploy as SSL certificates for HTTPS web servers are also suitable for IKEv2. You can get free certificate from Wosign, StartSSL, or LetsEncrypt, or any of your favorite CA.
The only few requirements wich certificate must comply with:
- Have an Extended Key Usage (EKU) flag explicitly allowing the certificate to be used for authentication purposes. OID 1.3.6.1.5.5.7.3.1 (often called TLS server authentication) All certificated issued for web servers authenitcation have this flag.
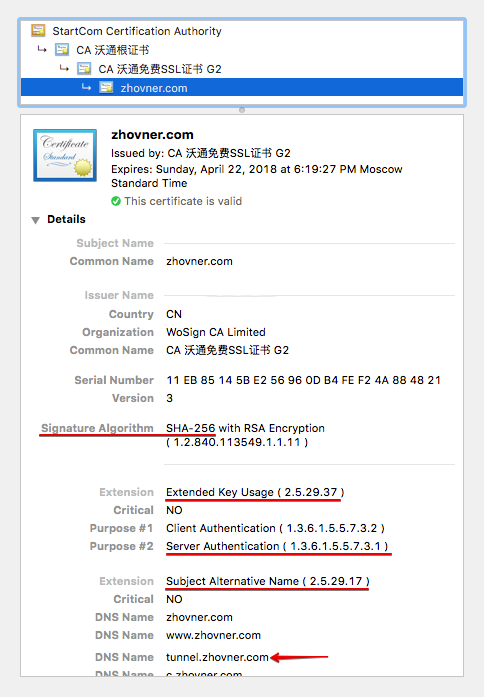
- Subdomain wich will be used as IKEv2 server adress must be in Subject Alternative Name. Needed domain must be added as a additional domain, not as general one when issuing SSL certificate. I will use
tunnel.zhovner.comas example. - (Optional) If possible choose SHA-256 instead of SHA-1 signature algorithm, because SHA-1 is weak and deprecated.
Selfsigned certificates
Selfsigned certificates requires to deploy complete PKI. Issue your own Root Certificate Authority (CA), destribute this CA to all clients systems, issue server certificate, manage CLR (Certificate Revocation List) and OCSP. This subject is very complicated and goes out this manual, so I won’t describe it here. In most cases you don’t need selfsigned certificates. It is required only if you are planning to use client certificate authentication (without username/password). If you decided to use selfsigned certificates, take a look at EasyRSA fork than allows to issue certificates suitable both for OpenVPN and IKEv2 and simplifies PKI management.
Server configuration
strongSwan - powerfull and open source IPsec/IKEv2 server and client solution. You will need any Linux box with 2.6 or 3.x kernel to run strongSwan server. Check that your favorite distro have strongSwan ≥ 5.x package in repo. If you run Linux in virtual container, make sure that you have XEN or KVM virtualization but not OpenVZ, because OpenVZ not supporting kernel IPsec.
I recommend Linode as VPS hosting bacause they provide additional /64 IPv6 routable subnet that easely can be assigned to IPsec clients.
In this example I will use Debian 8.2 jessie as most common distro. Make sure that your stongSwan package not older than 5.2.1-6+deb8u2
Installing strongSwan and extra plugins:
apt-get install strongswan libcharon-extra-plugins
On this step you must have all necessary certificates and key files.
List of required files:
privatekey.pem — RSA private key which was used for CSR when issuing certificate. Key must be non-encrypted.
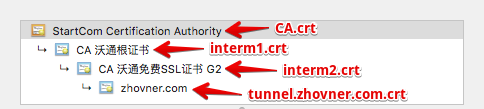
CA.crt — Root Certificate of your Certificate Authority. It can be downloaded from web or exported from system keychain.
intermediate1.crt — intermediate certificate of your Certificate Authority. If you get certificate from WoSign look at for Other Server.zip archive.
intermediate2.crt — (optional) Number of intermediate certificates may be varied, depending on your CA.
my.crt — your certificate. In the example this file will be named tunnel.zhovner.com.crt
How this chain looks from Google Chrome certificate information
Place each file to the proper path:
/etc/ipsec.d/private/privatekey.pem
/etc/ipsec.d/cacerts/ca.crt
/etc/ipsec.d/cacerts/intermediate1.crt
/etc/ipsec.d/cacerts/intermediate2.crt
/etc/ipsec.d/certs/tunnel.zhovner.com.crt
Edit /etc/ipsec.secrets that contains users and private keys credentionals:
Edit /etc/ipsec.conf:
Restart strongSwan to read new config files:
systemctl restart strongswan
Verify that all cerifitaces configured correctly by executing ipsec listall Notice that output is very long and must be readed from the top. Full certificates chain must be presented and Entity Certificate must contain “has private key”.
List of X.509 End Entity Certificates:

  altNames:  zhovner.com, www.zhovner.com, hub.zhovner.com, tunnel.zhovner.com, ....
  subject:  "CN=zhovner.com"
  issuer:   "C=CN, O=WoSign CA Limited, CN=CA CA 沃通免费SSL证书 G2"
  serial:    11:eb:85:14:5b:e2:56:96:0d:b4:fe:f2:4a:88:48:21
  validity:  not before Apr 22 17:19:27 2015, ok
             not after  Apr 22 18:19:27 2018, ok
  pubkey:    RSA 2048 bits,

<font color="red"><b>has private key</b></font>
  keyid:     0a:c6:c8:96:59:73:2c:6c:6f:7d:03:d0:35:da:e8:49:db:86:6e:fb
  subjkey:   f8:b0:bb:e9:9b:2c:8c:a2:90:b2:c0:77:b5:2b:c1:1f:d0:98:7e:d7
  authkey:   30:da:74:86:f3:28:90:56:9e:d7:31:31:c2:bd:59:cd:93:12:39:1d

List of X.509 CA Certificates:

  subject:  "C=CN, O=WoSign CA Limited, CN=CA 沃通免费SSL证书 G2"
  issuer:   "C=CN, O=WoSign CA Limited, CN=CA 沃通根证书"
  serial:    01:58:8c:3a:35:07:b3:f8:97:23:1c:76:b7:ef:85:dd
  validity:  not before Nov 08 03:58:58 2014, ok
             not after  Nov 08 03:58:58 2029, ok
  pubkey:    RSA 2048 bits
  keyid:     7b:07:23:98:e4:9f:25:2f:19:3f:76:4d:cd:0f:70:f6:4b:fc:b0:e6
  subjkey:   30:da:74:86:f3:28:90:56:9e:d7:31:31:c2:bd:59:cd:93:12:39:1d
  authkey:   e0:4d:bf:dc:9b:41:5d:13:e8:64:f0:a7:e9:15:a4:e1:81:c1:ba:31
  pathlen:   0

  subject:  "C=CN, O=WoSign CA Limited, CN=CA 沃通根证书"
  issuer:   "C=IL, O=StartCom Ltd., OU=Secure Digital Certificate Signing, CN=StartCom Certification Authority"
  serial:    1f:ce:a7:f6:a9:7f:e9
  validity:  not before Sep 18 02:46:36 2006, ok
             not after  Jan 01 02:59:59 2020, ok
  pubkey:    RSA 4096 bits
  keyid:     c2:06:fb:d5:3b:ba:0c:ee:f2:d2:d2:45:3d:07:52:26:3a:9f:e7:5f
  subjkey:   e0:4d:bf:dc:9b:41:5d:13:e8:64:f0:a7:e9:15:a4:e1:81:c1:ba:31
  authkey:   4e:0b:ef:1a:a4:40:5b:a5:17:69:87:30:ca:34:68:43:d0:41:ae:f2
  pathlen:   2

  subject:  "C=IL, O=StartCom Ltd., OU=Secure Digital Certificate Signing, CN=StartCom Certification Authority"
  issuer:   "C=IL, O=StartCom Ltd., OU=Secure Digital Certificate Signing, CN=StartCom Certification Authority"
  serial:    01
  validity:  not before Sep 17 23:46:36 2006, ok
             not after  Sep 17 22:46:36 2036, ok
  pubkey:    RSA 4096 bits
  keyid:     23:4b:71:25:56:13:e1:30:dd:e3:42:69:c9:cc:30:d4:6f:08:41:e0
  subjkey:   4e:0b:ef:1a:a4:40:5b:a5:17:69:87:30:ca:34:68:43:d0:41:ae:f2
That’s all. If everything looks right try connect to server. For debbuging connection problems run live logs stream journalctl -f -u strongswan
NAT
For let out VPN clients into Internet you need configure NAT. This subject is not covered in this manual.
For testing porpose (insecure):
echo 1 > /proc/sys/net/ipv4/ip_forward iptables -t nat -A POSTROUTING -o eth0 -j MASQUERADE
IPv6 issues
It is possible to assign native IPv6 addresses as well as IPv4 to VPN clients. For this you will need additional IPv6 subnet routed to you machine but not assigned on server interface. Unfortunately from lots of VPS providers that I’ve used, only Linode provide additional /64 IPv6 subnet for free.
For DigitalOcean and others providers you will need setup NDP proxy. Related thread https://lists.strongswan.org/pipermail/users/2015-July/008365.html
Client configuration
macOS >10.11 and iOS 9 autconfiguration profile
A configuration profile is an XML file that allows you to distribute configuration information. If you need to configure a large number of devices or to provide lots of custom email settings, VPN profiles, network settings, or certificates to a large number of devices, configuration profiles are an easy way to do it. In our case we will use VPN payload for one click configuration. For IKEv2 VPN connections the configuration profile is the only way to set advanced options like ciphers, DH groups, PFS, rekey timeout and so on. More about it https://developer.apple.com/library/ios/featuredarticles/iPhoneConfigurationProfileRef/Introduction/Introduction.html
Configuration profile can be created manually or via Apple Configurator 2 utility. Syntax is same for OS X and iOS. Profile can be distributed as mail attachments or via http link. Profile name must end with .mobileconfig and if you plan to share it over HTTP web server should response with Content-Type application/octet-stream.
Always On Mode
In Apple terms “Always On” mode prevents user from disconnect VPN manually. This mode can be configured only on device that in supervision mode. But you can do the same without supervision mode in more flexible way by usign rule that connects VPN automatically every time when you have internet connection. And reconnect it when connection lost. “On demand” mode can be configured only via .mobileconfig profile.
This mode can cause a problems when you can’t connect to the VPN server, becuase it will block internet access without VPN connection. To disable Always On mode unchek On Demand options in VPN connection preferences.
Debug log in macOS
If your connection doesn’t work in macOS, it silently disconnect without any error code. Debug log can be viewed in system utility Console.app. Type networkextension in search and try to connect.
To increase verbosity: sudo defaults write /Library/Preferences/com.apple.networkextension.control.plist LogLevel 6 Back to default: sudo defaults write /Library/Preferences/com.apple.networkextension.control.plist LogLevel 5
Also read this: https://forums.developer.apple.com/thread/31375
Autoconfig profile template
The easiest way to get working profile is to edit 4 variables in this template: RemoteAddress, RemoteIdentifier, AuthName, AuthPassword. Edit the rest of template following comments. Example profile of our VPN server supervpn.mobileconfig:
<?xml version="1.0" encoding="UTF-8"?>
<!DOCTYPE plist PUBLIC "-//Apple//DTD PLIST 1.0//EN" "http://www.apple.com/DTDs/PropertyList-1.0.dtd">
<plist version="1.0">
<dict>
    <key>PayloadContent</key>
    <array>
        <dict>
            <key>IKEv2</key>
            <dict>

                <!-- Username and password from ipsec.secrets -->
                <key>AuthName</key>
                <string>obama</string>
                <key>AuthPassword</key>
                <string>SuperPassword123</string>

                <!-- Hostname or IP address of VPN server.
                 Chosing IP address instead of DNS name can avoid issues with client DNS resolvers and speed up connection process. -->
                <key>RemoteAddress</key>
                <string>43.12.22.134</string>

                <!-- leftid in ipsec.conf -->
                <key>RemoteIdentifier</key>
                <string>tunnel.zhovner.com</string>

                <key>AuthenticationMethod</key>
                <string>Certificate</string>
                <key>ChildSecurityAssociationParameters</key>
                <dict>

                <!-- in ipsec.conf this proposal is: ike=aes256-sha256-modp2048 -->
                    <key>DiffieHellmanGroup</key>
                    <integer>14</integer>
                    <key>EncryptionAlgorithm</key>
                    <string>AES-256</string>
                    <key>IntegrityAlgorithm</key>
                    <string>SHA2-256</string>
                    <key>LifeTimeInMinutes</key>
                    <integer>1440</integer>
                </dict>
                <key>DeadPeerDetectionRate</key>

                <!--
                    None (Disable)
                    Low (keepalive sent every 30 minutes)
                    Medium (keepalive sent every 10 minutes)
                    High (keepalive sent every 1 minute)
                -->
                <string>High</string>
                <key>ExtendedAuthEnabled</key>
                <true/>
                <key>IKESecurityAssociationParameters</key>
                <dict>
                    <key>DiffieHellmanGroup</key>
                    <integer>14</integer>
                    <key>EncryptionAlgorithm</key>
                    <string>AES-256</string>
                    <key>IntegrityAlgorithm</key>
                    <string>SHA2-256</string>
                    <key>LifeTimeInMinutes</key>
                    <integer>1440</integer>
                </dict>

                <!--
                Always On OnDemand Rule
                Cen be disabled in connection preferences by "On Demand" checkbox
                http://www.v2ex.com/t/137653
                https://developer.apple.com/library/mac/featuredarticles/iPhoneConfigurationProfileRef/Introduction/Introduction.html
                https://github.com/iphoting/ovpnmcgen.rb
                -->
                <key>OnDemandEnabled</key>
                    <integer>1</integer>
                    <key>OnDemandRules</key>
                    <array>
                        <dict>
                            <key>Action</key>
                            <string>Connect</string>
                        </dict>
                    </array>
            </dict>
            <key>IPv4</key>
            <dict>
                <key>OverridePrimary</key>
                <integer>1</integer>
            </dict>
            <key>PayloadDescription</key>
            <string>Configures VPN settings</string>
            <key>PayloadDisplayName</key>
            <string>VPN</string>
            <key>PayloadIdentifier</key>
            <string>com.apple.vpn.managed.96C1C38F-D4D6-472E-BA90-9117ED8896B5</string>
            <key>PayloadType</key>
            <string>com.apple.vpn.managed</string>
            <key>PayloadUUID</key>
            <string>96C1C38F-D4D6-472E-BA90-9117ED8896B5</string>
            <key>PayloadVersion</key>
            <integer>1</integer>

            <!-- VPN connection name in Network Preferences -->
            <key>UserDefinedName</key>
            <string>London VPN</string>
            <key>VPNType</key>
            <string>IKEv2</string>
        </dict>
    </array>

    <!-- Set the name to whatever you like, it is used in the profile list on the device -->
    <key>PayloadDisplayName</key>
    <string>My Super IKEv2 VPN</string>

    <!-- A reverse-DNS style identifier (com.example.myprofile, for example) that identifies the profile. This string is used to determine whether a new profile should replace an existing one or should be added. -->
    <key>PayloadIdentifier</key>
    <string>com.zhovner.tunnel</string>

    <!-- A globally unique identifier, use uuidgen on Linux/Mac OS X to generate it -->
    <key>PayloadUUID</key>
    <string>F3FAD91C-019C-4A79-87A1-CF334C583339</string>
    <key>PayloadType</key>
    <string>Configuration</string>
    <key>PayloadVersion</key>
    <integer>1</integer>
</dict>
</plist>
iOS manual configuration
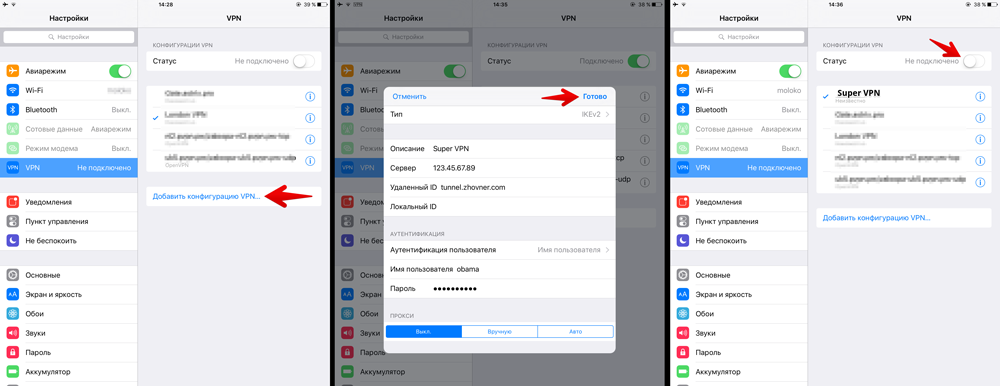
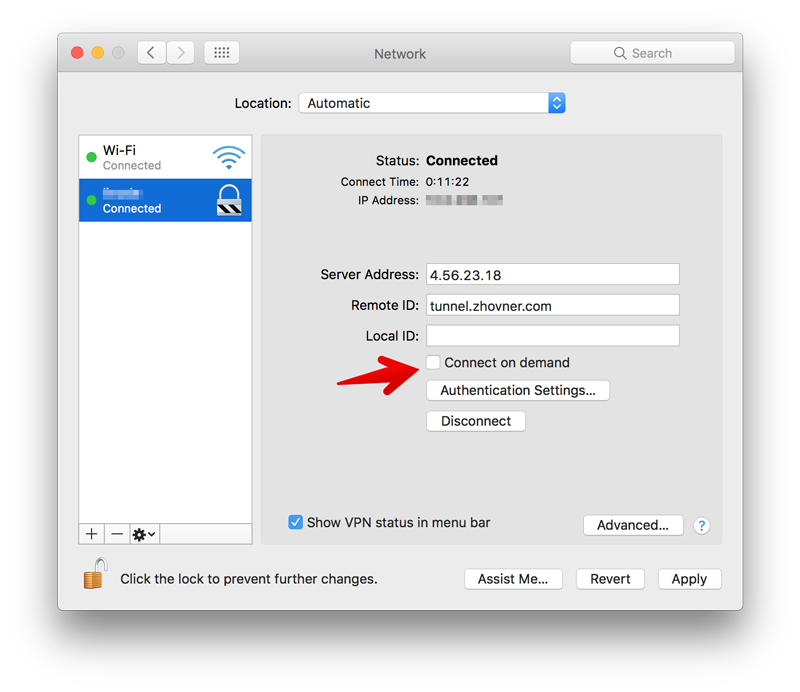
OS X 10.11 manual configuration
It’s impossible to set advanced options (like ciphers, DH groups, PFS, rekey timeout) via GUI. If you need it use configuration profile method.
- Create new VPN connection in network preferences
- Choose type IKEv2 and name of connection
- Set server address and RemoteID (leftid in ipsec.conf)
- Enter username and password from ipsec.secrets file
- Connect to VPN
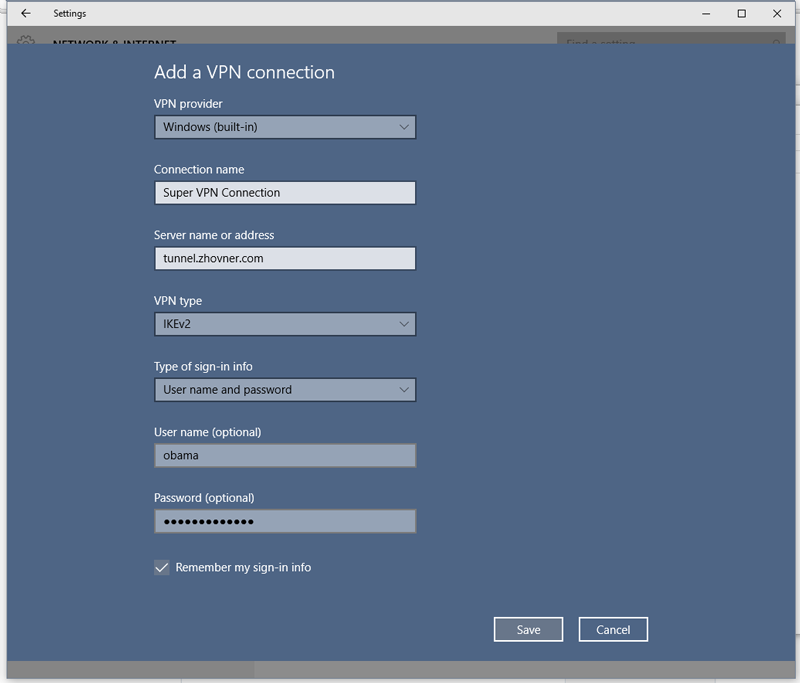
Windows 7/8/10 IKEv2 manual configuration
In windows you can’t define RemoteID separately from server address, so FQDN should be used. Also keep in mind that IPv6 will not work in windows.
Linux roadwarrior client
This also works on MacOS/FreeBSD
Install strongswan
Configure CA’s
Openssl and ca-certs must be installed.
rmdir /etc/ipsec.d/cacerts
ln -s /etc/ssl/certs /etc/ipsec.d/cacerts
Setup config /etc/ipsec.conf
conn my-super-vpn

    keyexchange=ikev2
    #forceencaps=yes
    dpdaction = restart
    dpddelay = 30s
    keyingtries=%forever

    # start at boot
    auto=start

    rekey=no
    reauth=no
    fragmentation=yes
    #compress=yes

    # left - local  side
    left=%any
    eap_identity=x220
    leftsourceip=%any,%any6
    leftauth=eap-mschapv2

    # right - remote side
    right=q.zhovner.com
    rightsubnet=0.0.0.0/0,::/0
Connect to server
ipsec restart